The comment section of your website plays a crucial role in engaging visitors, fostering discussions, and creating a sense of community. If you’re using the GeneratePress theme, customizing the comment box can enhance your site’s visual appeal and usability.
In this article, we’ll walk through the steps to design a stylish and user-friendly comment box.
Read More: How to Add an Author Image to Your WordPress Website
Summary of Customizations:
✅ Enabled comments in WordPress
✅ Styled the comment box and submit button
✅ Customized the name and email fields
✅ Removed the website field (optional)
✅ Modified the comment form layout (optional)
Step 1: Enable Comments in WordPress
Before customizing the comment box, ensure that comments are enabled on your website:
- Go to WordPress Dashboard → Settings → Discussion.
- Check Allow people to submit comments on new posts.
- Save your changes.
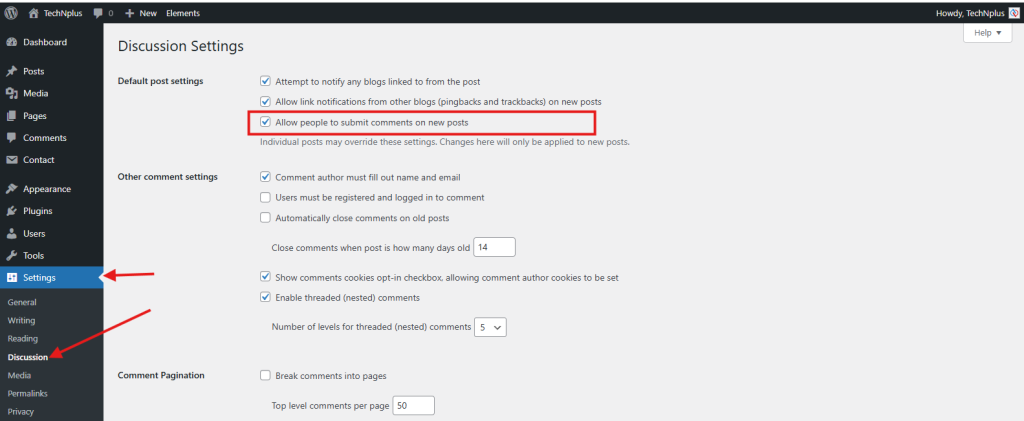
If comments are still not visible, check your GeneratePress theme settings under Appearance → Customize → Layout → Blog to ensure comments are enabled.
Step 2: Use a Child Theme (Optional but Recommended)
To prevent losing customizations when updating GeneratePress, it’s best to use a child theme. If you don’t have one:
1 . Create a new folder in wp-content/themes/ and name it generatepress-child.
2. Create a style.css file inside the folder and add this code:
/*
Theme Name: GeneratePress Child
Template: generatepress
*/
3. Activate the child theme in Appearance → Themes.
Alternatively, you can use Additional CSS in the WordPress Customizer without a child theme.
Step 3: Style the Comment Box with CSS
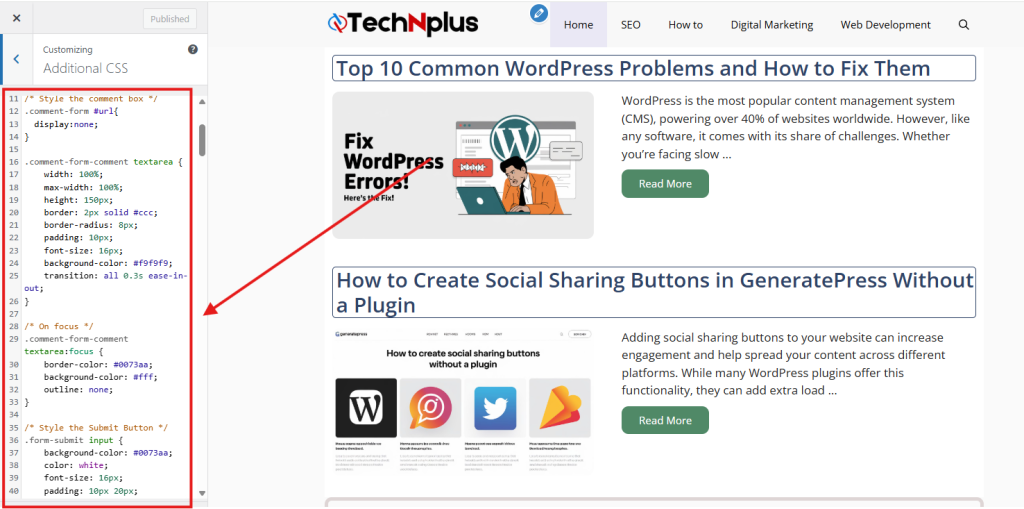
Now, let’s customize the look and feel of the comment box. Add the following CSS to Appearance → Customize → Additional CSS:
/* Style the Comment Box */
.comment-form-comment textarea {
    width: 100%;
    max-width: 100%;
    height: 150px;
    border: 2px solid #ccc;
    border-radius: 8px;
    padding: 10px;
    font-size: 16px;
    background-color: #f9f9f9;
    transition: all 0.3s ease-in-out;
}

/* On Focus Effect */
.comment-form-comment textarea:focus {
    border-color: #0073aa;
    background-color: #fff;
    outline: none;
}

/* Style the Submit Button */
.form-submit input {
    background-color: #0073aa;
    color: white;
    font-size: 16px;
    padding: 10px 20px;
    border: none;
    border-radius: 5px;
    cursor: pointer;
    transition: 0.3s;
}

.form-submit input:hover {
    background-color: #005580;
}
This code enhances the comment box by adding rounded corners, a smooth transition effect, and a hover effect on the submit button.
Step 4: Customize Name and Email Fields
By default, WordPress includes Name, Email, and Website fields. You can style them to match your design using CSS:
/* Style the Name and Email Fields */
.comment-form input[type=”text”],
.comment-form input[type=”email”] {
width: 100%;
padding: 10px;
font-size: 16px;
border: 2px solid #ccc;
border-radius: 8px;
background-color: #f9f9f9;
transition: all 0.3s ease-in-out;
}

.comment-form input[type=”text”]:focus,
.comment-form input[type=”email”]:focus {
border-color: #0073aa;
background-color: #fff;
outline: none;
}

/* Make Name and Email Fields Appear Side by Side */
@media (min-width: 768px) {
.comment-form-author, .comment-form-email {
display: inline-block;
width: 48%;
}
.comment-form-author {
margin-right: 4%;
}
}
This improves the layout, especially for desktop users, by making Name and Email fields appear side by side.
Step 5: Remove the Website Field (Optional)
If you want to remove the website field, add the following PHP snippet to your functions.php file:
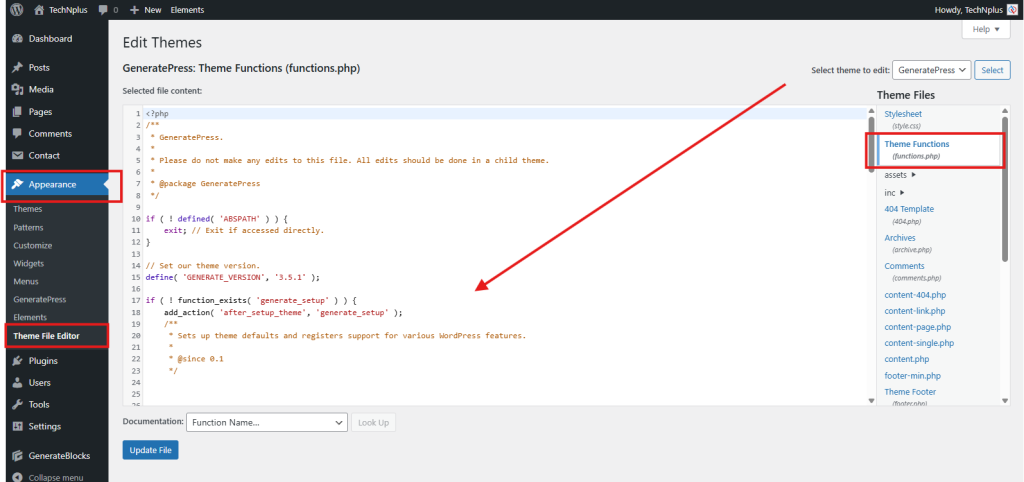
function remove_website_field($fields) {
    unset($fields['url']); // Removes the website field
    return $fields;
}
add_filter('comment_form_default_fields', 'remove_website_field');
Alternatively, you can hide the website field using CSS:
.comment-form-url {
    display: none !important;
}
This ensures that users only enter their name, email, and comment without an unnecessary website field.
Step 6: Modify the Comment Form Structure (Optional)
To further customize the comment form fields, use the following PHP snippet in functions.php:

function custom_comment_form_fields($fields) {
    $fields['author'] = '<p class="comment-form-author">
        <label for="author">Name</label>
        <input id="author" name="author" type="text" placeholder="Enter your name" required></p>';

    $fields['email'] = '<p class="comment-form-email">
        <label for="email">Email</label>
        <input id="email" name="email" type="email" placeholder="Enter your email" required></p>';

    return $fields;
}
add_filter('comment_form_default_fields', 'custom_comment_form_fields');
This modifies the placeholder text and structure of the Name and Email fields for a better user experience.
Final Thoughts
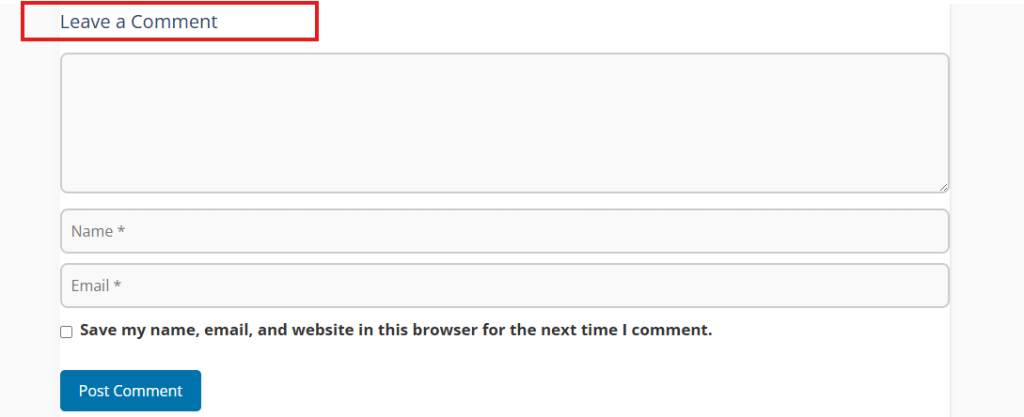
Customizing the comment box in the GeneratePress theme allows you to improve user experience and branding. By using CSS for styling and PHP for functionality tweaks, you can create a unique comment section that enhances engagement.
Thanks a lot, you just saved me from a lot of stress.
Thank you very much for your feedback.
thank you! this was awesome…
Thank you very much for your feedback.